Petoi Doc Center
🇺🇸English
🇺🇸English
  • Welcome to Petoi Doc Center
  • Getting Started Guide
  • 🙋‍♂️FAQ(Frequently Asked Questions)
  • Petoi robot joint index
    • Joint Pins on NyBoard
      • Nybble
      • Bittle
    • Joint Pins on BiBoard V0
      • Bittle X
      • Bittle X+Arm
    • Joint Pins on BiBoard V1
      • Bittle X
      • Bittle X+Arm
      • Nybble Q
  • Bluetooth Connection
    • BiBoard
    • NyBoard
  • Upload Firmware
    • NyBoard
    • BiBoard V0
    • BiBoard V1
  • Joint Calibration
  • Infrared Remote
    • Remote Controller
  • Mobile App
    • Introduction
    • Calibrator
      • Nybble
      • Bittle
    • Controller
  • Desktop APP
    • Introduction
    • Firmware Uploader
      • NyBoard
      • BiBoard V0
      • BiBoard V1
    • Joint Calibrator
      • NyBoard Preparation
      • BiBoard Preparation
      • Nybble
      • Bittle / Bittle X
        • Bittle (NyBoard)
        • Bittle X (BiBoard V0)
        • Bittle X (BiBoard V1)
      • Bittle X+Arm
        • BiBoard V1
        • BiBoard V0
    • Skill Composer
      • NyBoard Connection
      • BiBoard Connection
      • Interface
        • Nybble
        • Bittle / Bittle X
        • Bittle X+Arm
    • Tools
  • Block-based programming
    • Petoi Coding Blocks
      • NyBoard Preparation
      • BiBoard Preparation
    • Block-based Coding Curriculum - Learn Quadruped Robotics for Beginners
    • Python coding mode in Mind+
    • Generic Arduino Uno Blocks
    • Install Mind+ on Chromebook
  • Arduino IDE
    • Upload Sketch for NyBoard
    • Upload Sketch for BiBoard
    • Calibrate the joints with Arduino IDE
    • Serial Monitor
    • C++ Curriculum: Learn Quadruped Robotics for Beginners
    • Install Arduino IDE on Chromebook
  • Free Curriculum
    • 📚Download
  • APIs
    • 🖇️Serial Protocol
      • Feedback servos
      • Nested task queue and signal generator
    • 🐍Python API
    • 🐛8266 MicroPython controller
      • Run MicroPython on ESP8266
      • Setup WebREPL
      • Using the ESP-NOW protocol
    • 🦎8266 Arduino C Controller
    • ©️C++ API
    • 🍓Raspberry Pi serial port as an interface
      • For BiBoard V1
    • 💻Set up Development Environment on Chromebook
    • 🤖ROS
  • Nyboard
    • Overview
    • NyBoard V1_0
    • NyBoard V1_1 & NyBoard V1_2
  • BIBOARD
    • BiBoard V0 Guide
    • BiBoard Extension Hat
    • Demo Applications
      • 1.GPIO port
      • 2.Serial port
      • 3.Analog-digital converter
      • 4.Digital-Analog Converter
      • 5.EEPROM (Electrically Erasable Programmable read only memory)
      • 6.Gyro IMU(MPU6050)
      • 7.Infrared remote control
      • 8.PWM(Pulse Width Modulation)
      • 9.Servo(under construction)
      • 10.Classic Bluetooth serial port SPP
      • 11.Bluetooth low energy (BLE) serial port pass-through
      • 12.File system SPIFFS
      • 13.Add hardware partition configuration option in Arduino IDE
      • 14.Play MP3
      • 15.The usage of Wi-Fi OTA(Over-The-Air)
    • BiBoard V1 Guide
  • Communication Modules
    • Introduction (For NyBoard)
    • USB Uploader (CH340C or CH343G)
    • Dual Mode Bluetooth
    • WiFi module ESP8266
      • ESP8266 + Python Scripts Implement wireless crowd control
  • Extensible Modules
    • Introduction
    • MU Camera
    • Ultrasonic Sensor
    • Light Sensor
    • Touch Sensor
    • Gesture Sensor
    • PIR Motion Sensor
    • IR Distance Sensor
    • Voice Command Module
    • Petoi AI Vision Module
    • Advanced development and application of AI vision modules
      • Model Training
      • Model quantification
      • Model deployment
      • Training on the COCO DIY dataset
    • Robot Arm
      • Upgrade your older Bittle/Bittle X for the robotics arm gripper
    • 🎮Joystick with Micro:Bit
  • Applications
    • Melody Creation
    • Skill Creation
    • OpenCat Imitation Tutorial
    • Programmable Puppet Character
    • Tutorial for simulating Bittle In Isaac Sim
  • History
    • Upload Sketch For NyBoard (software 1.0)
  • Technical Support
    • 💾Supporting Application and Software
    • 🔧Burn Bootloader for NyBoard
    • 🛠️Useful Tools
    • 🔋Battery
  • Useful Links 🕸
    • 🔭Home of Petoi Robots
    • 🛒Shop Coding Robots
    • 💿GitHub of OpenCat
    • 🎪PetoiCamp (Forum)
    • 📽️Petoi Robot Videos
    • 📬Users' repositories
Powered by GitBook
On this page
  • Use the Simple Bootloader Resetter
  • Use Arduino UNO Board
  • Use USBtinyISP or USBasp
  • * Upload sketches using a Programmer

Was this helpful?

Export as PDF
  1. Technical Support

Burn Bootloader for NyBoard

PreviousSupporting Application and SoftwareNextUseful Tools

Last updated 1 year ago

Was this helpful?

If you cannot upload sketches to the NyBoard (the "not in sync error") and verify that the serial connection is all good, the NyBoard's bootloader might be crashed during the last upload.

Verify that the serial connection is all good means:

  1. The USB cable has data wires rather than just the power wires. The USB cable included in the Petoi package should be good.

  2. You have the proper driver for the uploader, or your computer can automatically install the driver. You can see and select the serial port in the Arduino IDE -> Tools -> Port.

  3. All the contacts along the loop are connected firmly.

  4. You have successfully uploaded sketches previously.

There could be several reasons why the NyBoard's bootloader crashes. Some of the common causes include:

  1. Uploading the sketch at a high baud rate

  2. Using a malfunctioning USB cable

  3. Using a power source that is not sufficient

  4. Using a low-quality or damaged Uno board

  5. Disrupting the upload process by pressing the reset button or unplugging the board

  6. Memory overflow

In the specific case of Petoi robots, the sketch size and errors in the code are major causes of the crashed bootloader. Uploading a sketch to the Uno replaces the existing bootloader code with the new sketch. If the sketch is too large to fit in the memory or if there are errors in the code causing memory overflow, the bootloader may corrupt.

Use the Simple Bootloader Resetter

From August 2023, we will ship a simple bootloader resetter with the NyBoard. If you got an earlier batch and need to reset the bootloader, please write to to request a free shipment.

The old version:

If the light ends up red, it means the resetting operation fails. It's probably a malfunction of either the NyBoard or the bootloader resetter.

Use Arduino UNO Board

  1. Open the sketch ArduinoISP.ino.

  2. Select the items in the menu bar Tools > Board (Arduino UNO) and Port that connect to the UNO board.

  3. Upload the sketch ArduinoISP.ino to the UNO board.

  4. Wire the UNO board with NyBoard.

  5. Select the Arduino as ISP in the menu bar Tools>Programmer.

  6. Click the menu Burn Bootloader.

At Step 6, you'd better push the jumpers with your fingers to ensure good contact.

Since the NyBoard uses the same chip as a regular Arduino Uno, if you have two Nyboards, you can use one as a programmer(upload the sketch ArduinoISP.ino) to burn the bootloader to another one as the target. The steps are similar to the above, but you need to assign the RESET pin to 6 in the ArduinoISP.ino as follows:

Use USBtinyISP or USBasp

Connect the USBtinyISP programmer and NyBoard. The pins connection map is as follows:

MI --> MISO V --> VCC

SC --> SCK MO --> MOSI

R --> Reset G --> GND

Connect the USBtinyISP programmer to the computer with a USB port. After installing the driver as follows:

The driver is as follows:

With NyBoard V1_*, you can simply choose Arduino Uno under the Tool menu of Arduino IDE, then burn the bootloader as follows:

While Burning the bootloader, you'd better push the UsbtinyISP with your fingers to ensure good contact.

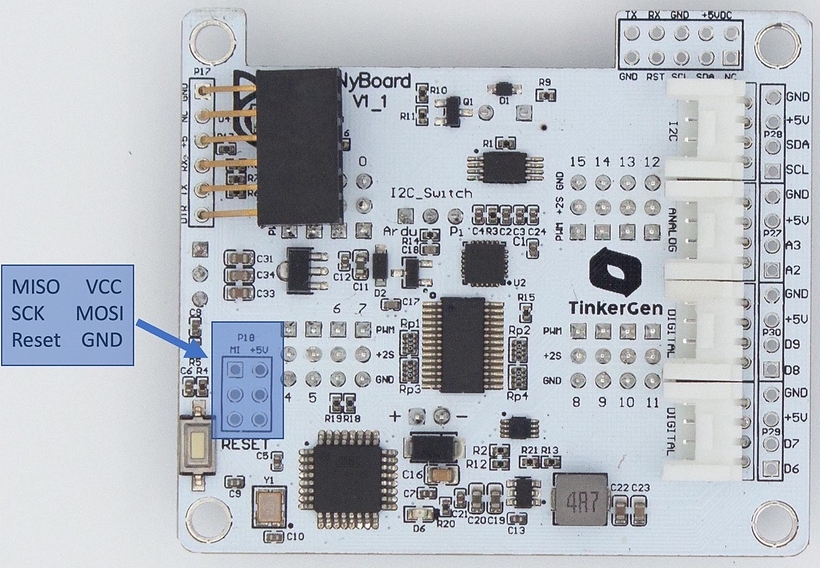
Connect the USBasp programmer and NyBoard. The pins connection map is as follows:

MISO --> MISO VCC --> VCC

SCK --> SCK MOSI --> MOSI

Reset --> Reset GND --> GND

Connect the USBasp programmer to the computer with a USB port. Afer installing the driver as follows:
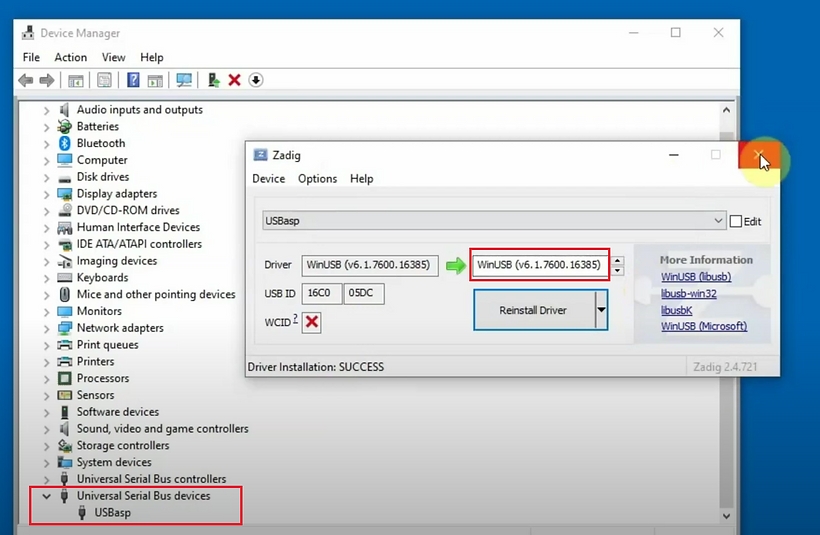
The driver installer is as follows:

With NyBoard V1_*, you can simply choose Arduino Uno under the Tool menu of Arduino IDE, then burn the bootloader as follows:
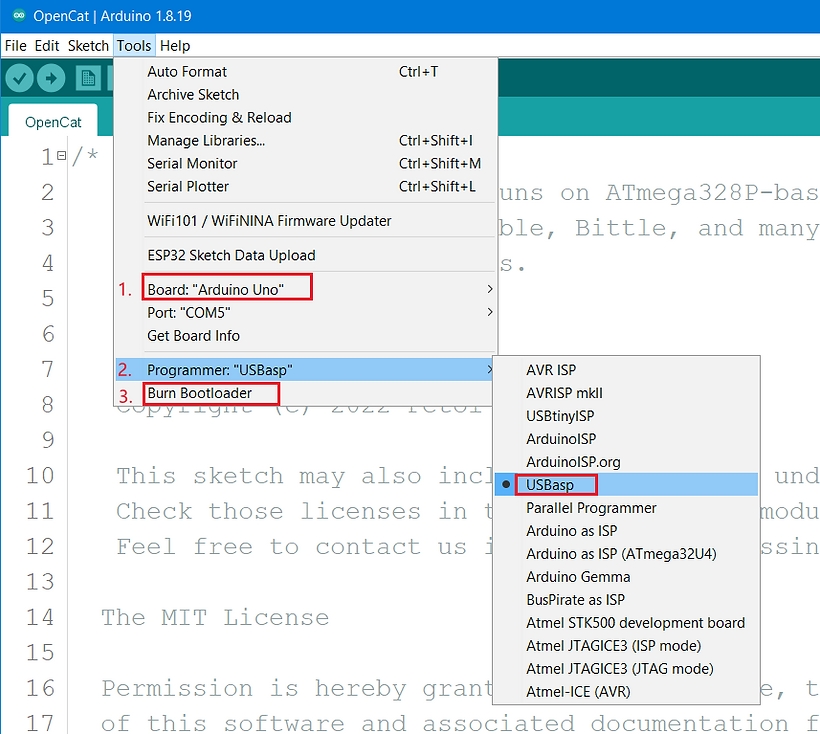
While Burning the bootloader, make sure they have good contact. You can press the jumpers slightly to ensure the connections.

For details about how to use the USBasp programmer, you can refer to:

* Upload sketches using a Programmer

You may also use the Programmer to upload sketches to the board.

It allows larger sketches because the bootloader takes about 2 KB on the flash. However, it will overwrite the default bootloader, and you WON'T be able to upload sketches using the regular USB uploader. And uploading sketches using the programmer is also slower. So it's not recommended unless your serial uploading routine is broken.

The jumper connection is as follows:

USBtinyISP

USBasp

The socket from the USBasp programmer to ICSP on NyBoard is not compatible. In this case, You need to use female-to-male jumper wires to connect the pins on each side as follows (It's a one-time operation, so there is no need for soldering)
🔧
support@petoi.com
305KB
usbtinyisp_libusb_1.2.6.0.zip
archive
5MB
zadig-2.8.zip
archive