> For the complete documentation index, see [llms.txt](https://docs.petoi.com/llms.txt). Markdown versions of documentation pages are available by appending `.md` to page URLs; this page is available as [Markdown](https://docs.petoi.com/thai/communication-modules/usb-downloader-ch340c.md).
# USB Uploader (CH340C or CH343G)
ใช้ module CH340C USB bridge Window 10, Linux และ macOS all drive-free โดย Specific interface แสดงดังภาพดังนี้

**NyBoard download interface**: ในการเชื่อต่อกับ NyBoard ต้อง dowload program firmware หุ่นยนต์ เพื่อใช้ในการ communication กับ computer ผ่าน Serial port
**Communication module debugging interface**: ใช้เชื่อมต่อโมดูล Bluetooth หรือ WiFi และอัพเดทโปรแกรมโมดูล และ debug พารามิเตอร์ต่างๆ โดยเพื่อหลีกเลี่ยงการใช้สาย Dupont ที่อาจจะซับซ้อน การเรียงลำดับขาจะต่างกับขาดาวน์โหลดของ NyBoard โดยขา TX/RX จะถูกสลับกันและขา GND จะกลายเป็นขา RTS สำหรับรายละเอียดเพิ่มเติมเกี่ยวกับวิธีใช้ Debugging Interface ของโมดูลการสื่อสาร โปรดดูต่อไปในบทที่เกี่ยวข้อง
{% hint style="danger" %}
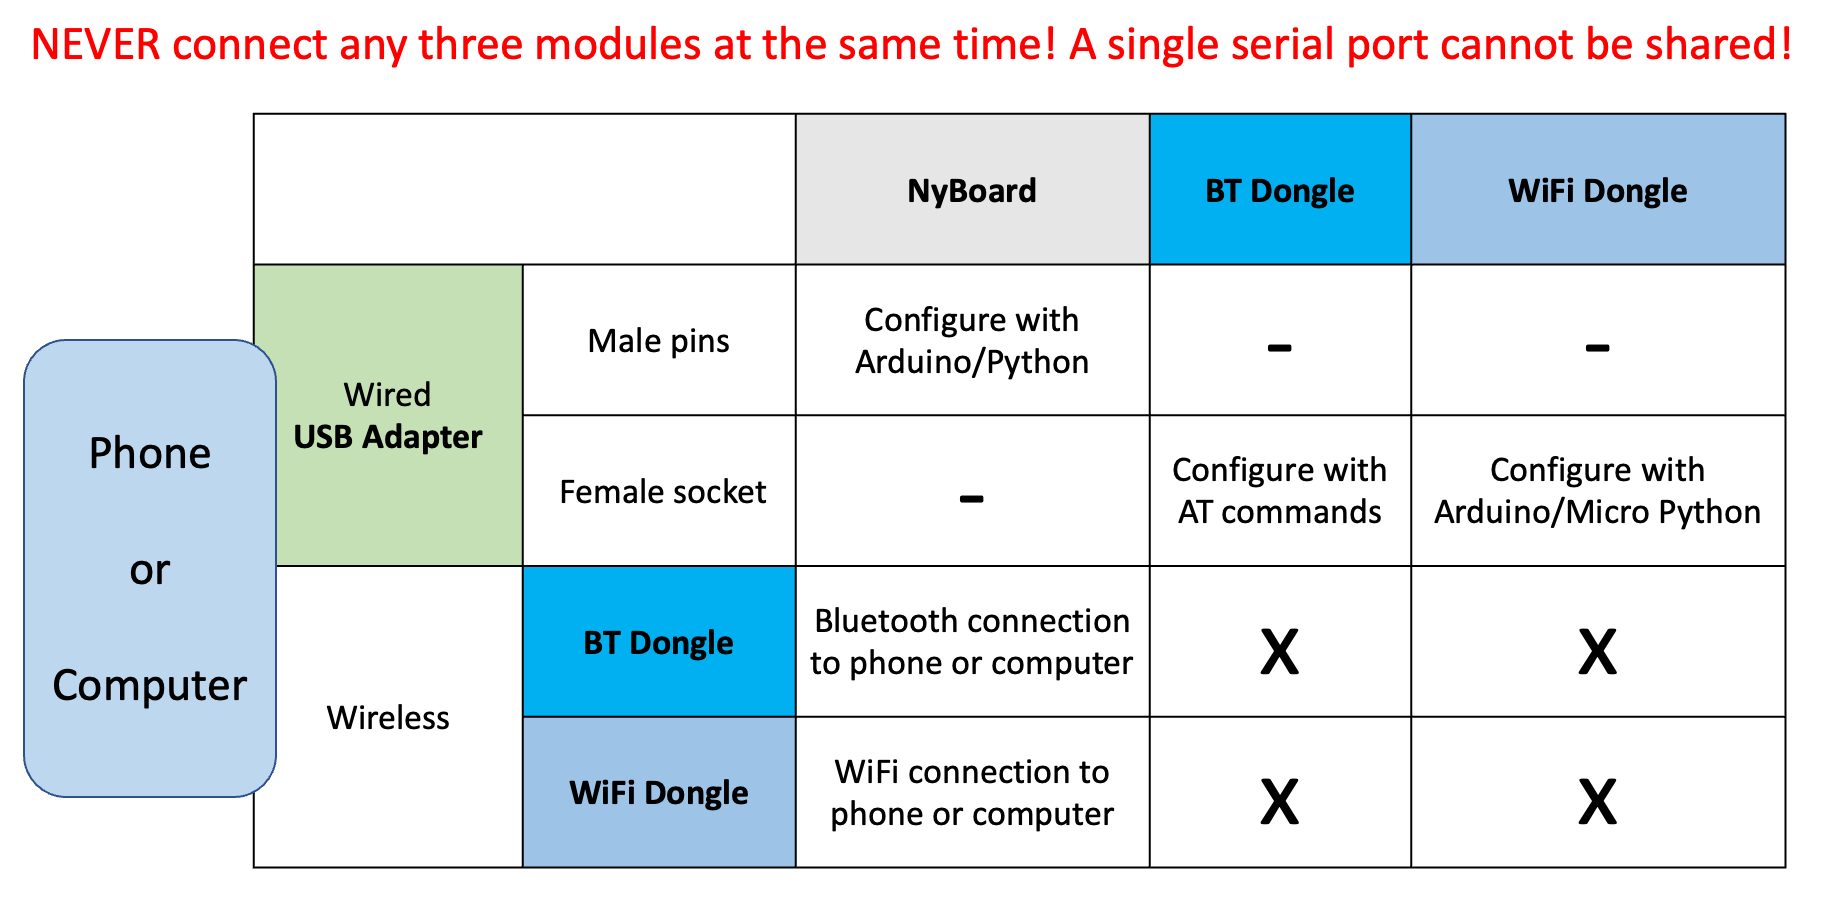
ไม่ควรเสียบ NyBoard และโมดูลอื่นๆ (WiFi หรือ Bluetooth) พร้อมกัน! นั่นจะทำให้พอร์ตซีเรียลถูกบล็อค.
{% endhint %}
## Connect NyBoard
 
เสียบขา 6 ขา (H1) ของ USB uploader เข้ากับช่อง Uploader ของ NyBoard แล้วใช้สาย USB data ที่มากับอุปกรณ์ นำหนึ่งข้างเสียบเข้ากับพอร์ต MicroUSB ของโมดูล USB upload และอีกข้างเสียบเข้ากับพอร์ต USB ของคอมพิวเตอร์
คลิกขวาที่ "**This PC**" บนหน้าจอ desktop ของ Windows แล้วคลิก "**Manage**" ด้วยปุ่มเม้าส์ซ้าย (แนะนำให้ใช้วิธีนี้ แต่คุณสามารถดำเนินการใน browser ได้เช่นกัน) ดังรูปด้านล่าง จากนั้นเลือก "**Device Manager**" ในหน้า "**Computer Management**" เพื่อตรวจสอบพอร์ตซีเรียลที่เชื่อมต่อ:
 

เปิดโปรแกรม Arduino IDE หรือ Desktop App Firmware Uploader แล้วเลือกพอร์ต COM ที่เชื่อมต่อกับ NyBoard เพื่อทำการอัพโหลด Firmware และใช้ Serial monitor เพื่อสื่อสารกับบอร์ดได้เช่นกัน
ตัวอัพโหลดมี LED 3 ดวง: ไฟเลี้ยง, Tx, และ Rx หลังจากการเชื่อมต่อแล้ว หลอดไฟ Tx และ Rx ควรจะกระพริบเป็นเวลา 1 วินาทีเพื่อแสดงการสื่อสารเริ่มต้น แล้วจะดับลง เหลือเพียงหลอดไฟแสดงสถานะไฟเลี้ยงเท่านั้น คุณสามารถหาพอร์ตใหม่ใต้ **Tool->Port** ได้
* “/dev/cu.usbserial-xxxxxxxx” (Mac)
* “COM#” (Windows)
* “ttyUSB#**”** (Linux)
{% hint style="warning" %}
สำหรับ Linux เมื่อเชื่อมต่ออัปโหลดเพื่อนับความสำเร็จ คุณจะเห็น "ttyUSB #" ในรายการพอร์ตซีเรียล แต่คุณอาจได้รับข้อผิดพลาดพอร์ตซีเรียลในขณะที่กำลังอัปโหลด คุณต้องการให้สิทธิ์กับพอร์ตซีเรียล โปรดไปที่ลิงค์นี้และดำเนินการตามคำแนะนำ:
{% endhint %}

ถ้าไฟ Tx และ Rx ยังค้างอยู่ หมายความว่ามีปัญหากับการสื่อสารผ่านพอร์ต USB โดยทั่วไปเป็นเพราะการป้องกันไฟล้นกระแสจากคอมพิวเตอร์ของคุณ หากคุณไม่ได้เชื่อมต่อ NyBoard กับแหล่งจ่ายไฟภายนอกและเซอร์โวเคลื่อนที่ทั้งหมดเคลื่อนที่พร้อมกัน
### The Drivers
{% hint style="info" %}
ถ้าคุณไม่สามารถหาพอร์ตซีเรียลหลังจากเชื่อมต่อกับคอมพิวเตอร์ของคุณได้ คุณอาจจะต้องติดตั้งไดรเวอร์สำหรับชิป CH340
* [Mac](https://tn2lsjcal7.larksuite.com/drive/folder/fldusANNJtuYuZmpAfOZVlHvcKN)
* [Windows](https://tn2lsjcal7.larksuite.com/file/boxusYfwl2csrkA8G4DfBebmnkh)
{% endhint %}
{% hint style="info" %}
For ChromeOS:
1. Download the Arduino IDE(e.g. 1.8.19) for Linux from
2. Install it on the Chromebook. Please refer to the video at
3. Plug the Bittle USB adapter into the robot and the Chromebook.
4. Set the Chromebook Linux VM to recognize the USB port
Settings => Advanced => Developers => Linux development environment => Manage USB devices => USB Serial (turn on)
หมายเหตุ: ขั้นตอนที่ 4 จะต้องทำซ้ำทุกครั้งเมื่อมีการเชื่อมต่อ USB อีกครั้งหรือมีการเปิดเครื่องใหม่
{% endhint %}
---
# Agent Instructions
This documentation is published with GitBook. GitBook is the documentation platform designed so that both humans and AI agents can read, navigate, and reason over technical content effectively. Learn more at gitbook.com.
## Querying This Documentation
If you need additional information that is not directly available in this page, you can query the documentation by asking a question.
Perform an HTTP GET request on the following URL with the `ask` and `goal` query parameters:
```
GET https://docs.petoi.com/thai/communication-modules/usb-downloader-ch340c.md?ask=&goal=
```
`ask` is the immediate question: it should be specific, self-contained, and written in natural language.
`goal` is what the user is ultimately trying to achieve, the reason they need the answer. Sharing it helps GitBook give you a better, more relevant answer. A goal is most helpful when it describes the outcome the user wants rather than restating the question. For example, with `ask=how do I create an API token`, a goal like `automate deployments from our CI pipeline` lets GitBook tailor the answer to that use case.
The response will contain a direct answer to the question and relevant excerpts and sources from the documentation.
Use this mechanism when the answer is not explicitly present in the current page, you need clarification or additional context, or you want to retrieve related documentation sections.